Build an AI Product Description Generator That Checks Its Facts (Free n8n Template)

Last tested on n8n 2.46, November 2026.
Most stores with a large catalogue end up stuck between supplier copy that every other retailer pastes onto their product pages and blank descriptions that leave shoppers guessing. If you try a free AI product description generator like Copy.ai, QuillBot, or Ahrefs, you have to feed in features one product at a time, and nothing checks what comes back: Grammarly’s sample output invents a claim that never appeared in its prompt, while Metorik’s generator reminds you to verify that its output is true. Paid apps automate product descriptions across a catalogue, yet they bill per product. By the end of this guide, you’ll have an n8n workflow that writes each description from the product’s own specs and manufacturer page, checks every number in code, and waits for your approval in Slack before updating Shopify.
This guide writes the intro, not the whole description. Most product pages already carry a deep block of copy underneath: spec bullets, feature lists, a table of dimensions, sometimes the manufacturer’s own marketing blocks. That part is usually the same on every store selling the product, and it works fine as reference material. The two or three paragraphs at the top are what shoppers read first and the part that sets your page apart from every other reseller’s, so that’s where a unique, fact-checked description matters most. The template writes only that opening and leaves everything below it as it is.
What you’ll build
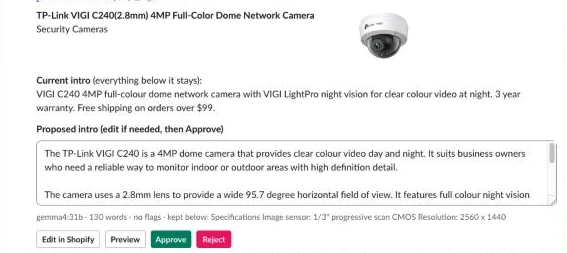
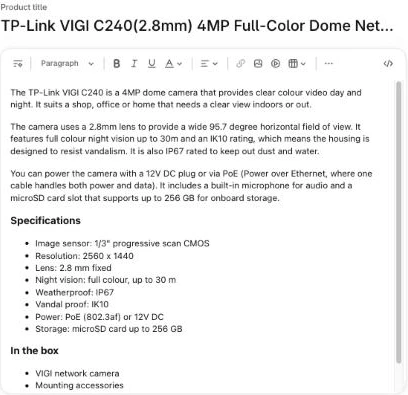
When a product is ready for review, a card arrives in Slack for the TP-Link VIGI C240(2.8mm) 4MP Full-Color Dome Network Camera. It shows the product thumbnail, the current intro from your store, and the proposed draft inside an editable text box, followed by a context bar reading gemma4:31b · 130 words · no flags · kept below: Specifications .... Every figure in that draft (4MP, 2.8mm, 95.7 degrees, 30m, IK10, IP67, 256 GB) was found in the camera’s specs or on TP-Link’s page, so the code check had nothing to flag; when a draft does mention a number the sources don’t contain, the bar shows it with a warning before anyone can publish it. You reword a sentence right inside the Slack text box, click Approve, and within a minute the new intro is live above the existing specification list on your Shopify product page.
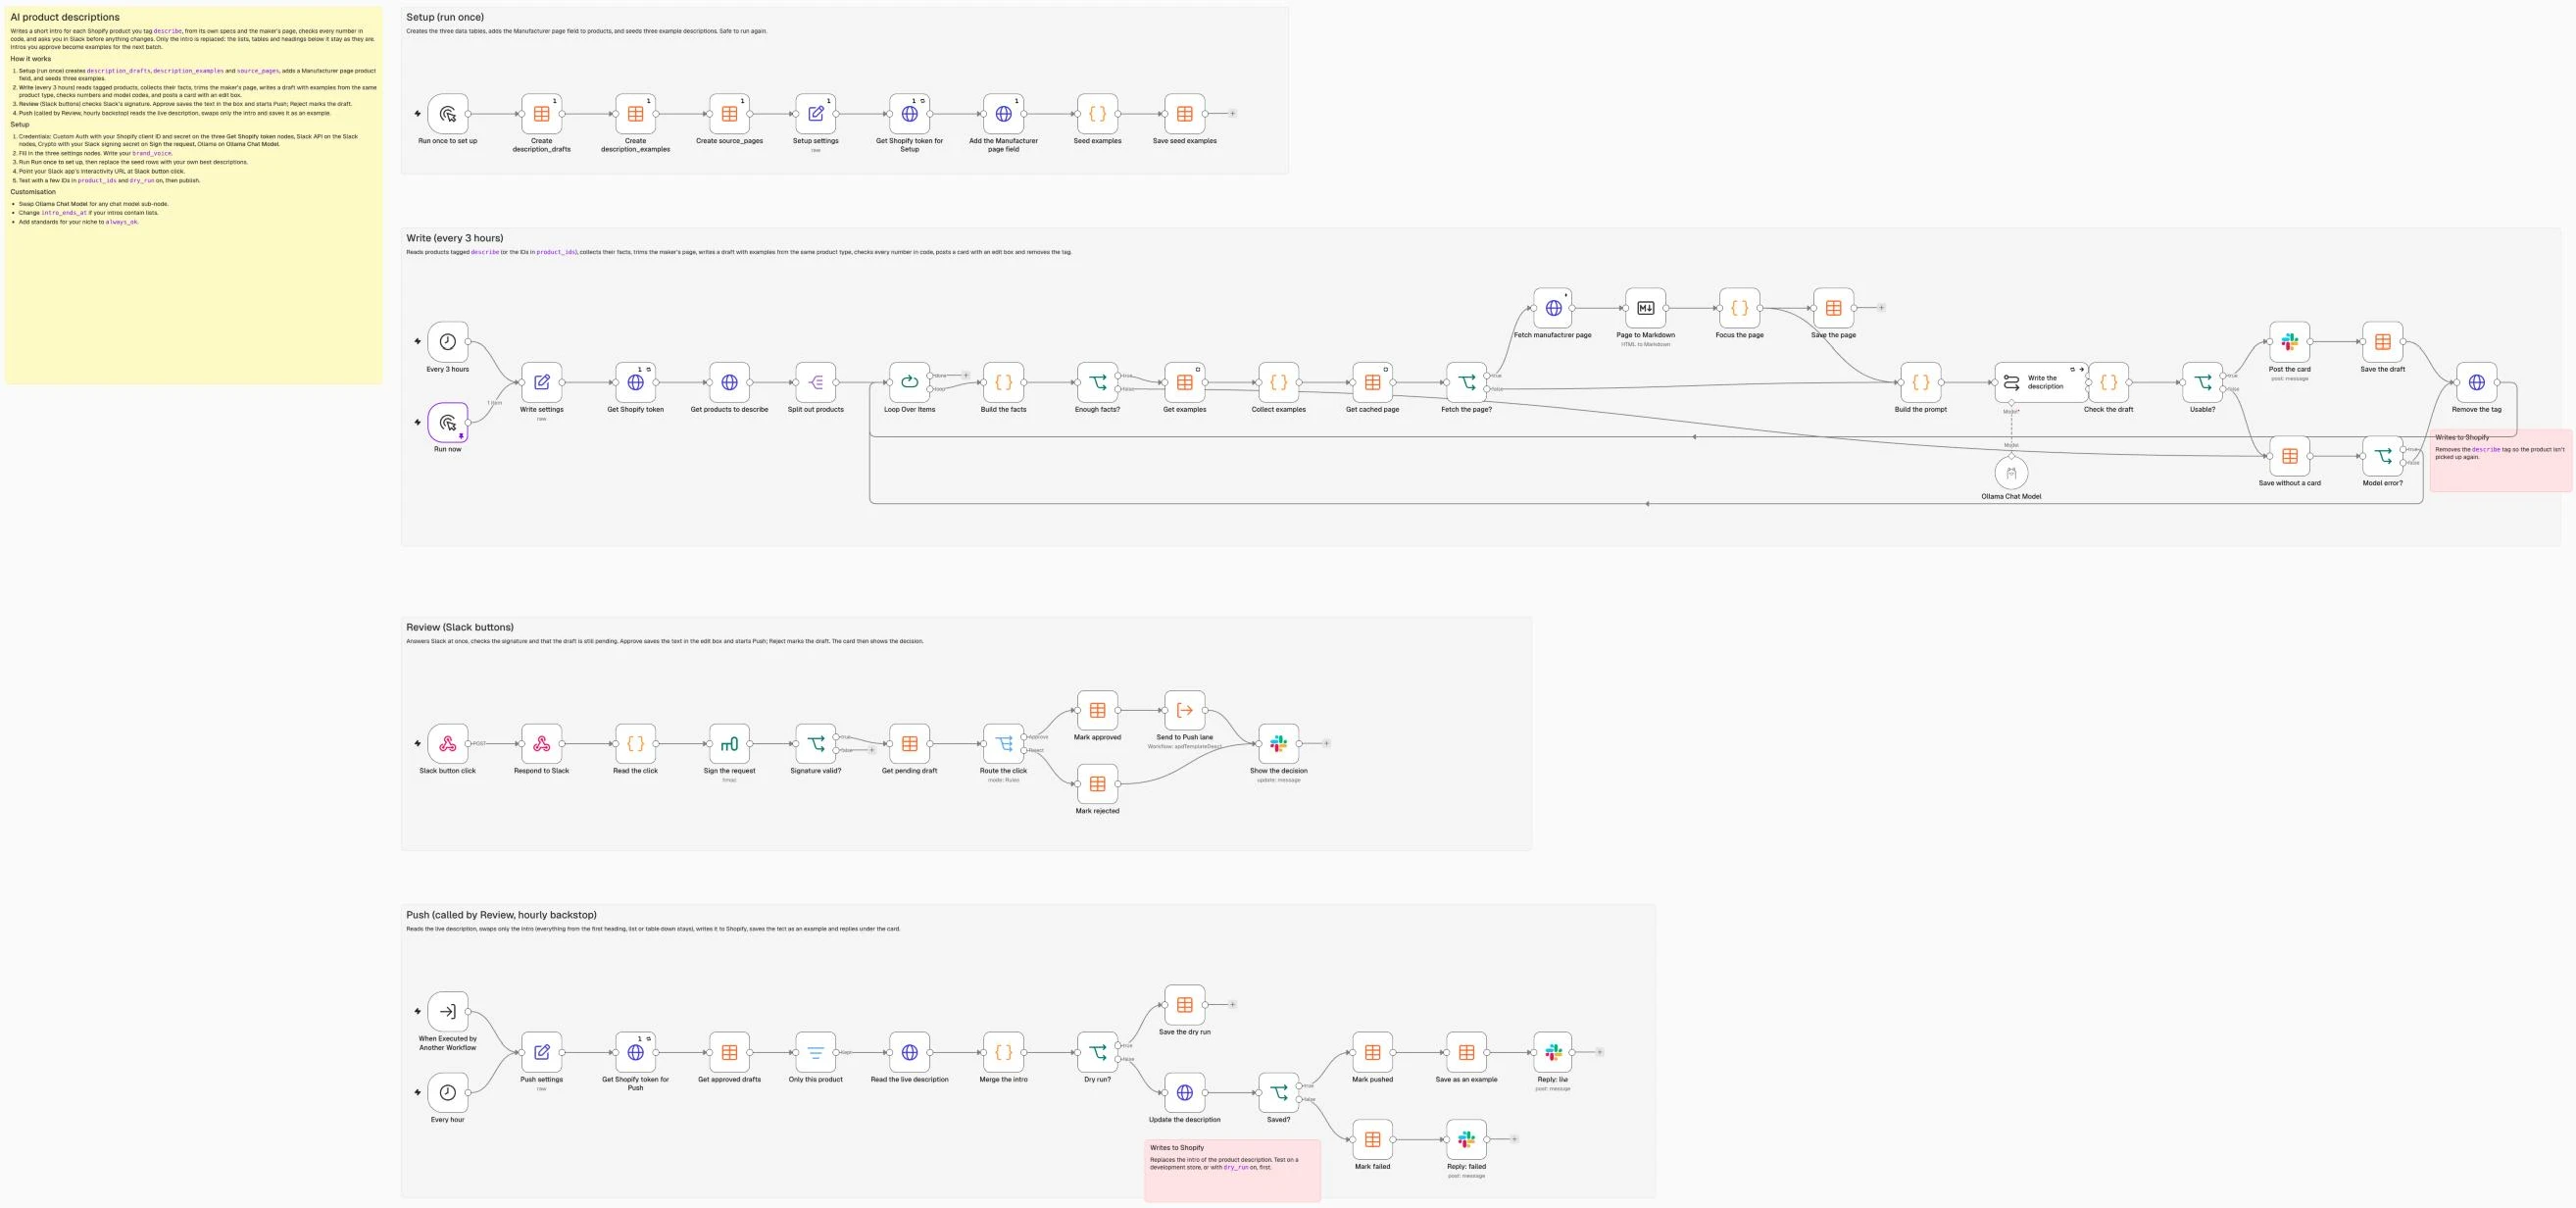
Behind that card sits a single n8n workflow organised into four horizontal lanes: Setup, Write, Review, and Push.
What you need
- n8n with Data Tables on either the free self-hosted Community Edition or n8n Cloud.
- A custom Shopify app with
read_productsandwrite_productsscopes, plus its client ID and client secret. - A Slack app with Interactivity enabled, the
chat:writebot token scope, and its signing secret. - An Ollama Cloud API key, or credentials for any other chat model sub-node that n8n supports.
- Product facts in Shopify: metafields (Shopify’s standard product attributes work out of the box) or a spec list or table in the product description, plus, optionally, the manufacturer’s product page in the Manufacturer page field that the Setup lane adds.
- Running cost: about US$0.30 per 1,000 descriptions on the default model, measured on our test products at Ollama Cloud’s list prices (checked November 2026).
How it works

- Setup (Manual Trigger): creates three n8n Data Tables (
description_drafts,description_examples, andsource_pages), adds a Manufacturer page URL field to your products, and seeds three example descriptions so the prompt has a clear voice from your very first run. - Write (runs every 3 hours or manually): fetches Shopify products tagged
describe, collects their facts from metafields and from the lists and tables already in the description, fetches and trims the manufacturer’s web page, writes a draft in your brand voice using approved examples from the same product type, checks the output in code, and posts a review card to Slack. The language model only sees verified facts from your catalogue and the manufacturer’s page, and a JavaScript node checks the numbers afterward because a language model cannot reliably audit its own maths or figures. - Review (Webhook): verifies the request signature from Slack, reads the clicked button alongside the current text inside the edit box, marks the row
approvedorrejected, and triggers the Push lane. Keeping a human reviewer in the loop follows Google’s guidance on generative AI content, which states that you should manually fact-check and review AI-generated content for accuracy before publishing, while giving you a fast way to judge flagged numbers. - Push (called immediately by Review, plus an hourly schedule as a backstop): converts the approved plain text into clean HTML paragraphs, swaps them in for the old intro (everything from the first heading, list or table down stays as it is), writes the result to Shopify with the
productUpdatemutation, saves the approved copy as a future category example, and replies “Live on the store” under the Slack card. Replacing only the intro keeps the structured specification tables underneath intact.
Step 1: Decide what the description does, then create the tables and settings
Before adding nodes, decide what job the prose above your spec table actually performs for a shopper. In Nielsen Norman Group’s ecommerce usability studies, 20% of task failures (shoppers who couldn’t complete a purchase) came from incomplete or unclear product information, and their researchers recommend answering practical questions quickly without burying the buyer in fluff. When your page already displays a structured table of dimensions and attributes below the fold, the written intro only needs two or three sentences explaining what the product is and who it suits, followed by one or two short paragraphs on what it is like to own, power, or install, totalling 80 to 150 words with no bullet list.
Create the tables
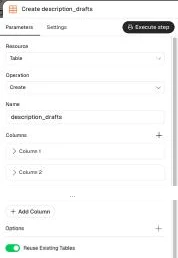
In the Setup lane, start with a Manual Trigger named Run once to set up and connect three Data table nodes in sequence: Create description_drafts, Create description_examples, and Create source_pages (each set to Table > Create, with Reuse Existing Tables and Execute Once turned on so re-running Setup never wipes your data). Configure the three tables with these columns:
| Table | Columns |
|---|---|
description_drafts | product_id, title, category, old_intro, intro_mode, draft_text, final_text, flags, model, status, error, html, slack_channel, slack_ts (all String); words (Number); edited (Boolean) |
description_examples | category, text, source (all String; source is seed, approved or edited) |
source_pages | url, focused_text, fetched_at, status (all String) |
The status column in description_drafts tracks each product through its lifecycle using one of seven values: needs_specs, failed, pending, approved, rejected, pushed, or dry_run.
Add the Manufacturer page field
A stock Shopify store has nowhere to keep the manufacturer’s product page, so the Setup lane creates a product field for it. Add a Set node named Setup settings (Mode JSON, Execute Once on) with your store domain and the field’s namespace and key:
{
  "store_domain": "your-store.myshopify.com",
  "manufacturer_url_namespace": "custom",
  "manufacturer_url_key": "manufacturer_url"
}
Connect it to an HTTP Request node named Get Shopify token for Setup (the same settings as Get Shopify token in Step 2, reading store_domain from Setup settings) and then to an HTTP Request node named Add the Manufacturer page field, which posts this mutation to https://{{ $('Setup settings').first().json.store_domain }}/admin/api/2026-10/graphql.json with the token in the X-Shopify-Access-Token header and variables { ns: $('Setup settings').first().json.manufacturer_url_namespace, key: $('Setup settings').first().json.manufacturer_url_key }:
mutation Field($ns: String!, $key: String!) {
  metafieldDefinitionCreate(definition: {
    name: "Manufacturer page", namespace: $ns, key: $key, ownerType: PRODUCT, type: "url", pin: true,
    description: "The maker's product page. The description template reads it for facts."
  }) {
    createdDefinition { id }
    userErrors { field message code }
  }
}
The field is a URL type and pinned, so it shows on every product page in the Shopify admin, where you or a CSV import can fill it in. When you run Setup a second time, Shopify answers with a TAKEN error, which only means the field already exists. If you already keep the manufacturer’s page in another URL metafield (the product data enrichment guide in this set uses custom.spec_url), point manufacturer_url_namespace and manufacturer_url_key at it in both settings nodes instead.
Set your brand voice
The voice of every draft comes from two places, and the examples matter more than the words you put in the prompt. The brand_voice setting in Write settings is two or three plain sentences about how your store sounds, such as “Plain-spoken and friendly, like a shop assistant who knows the gear and likes it. Short sentences, everyday words, no hype.”, and it fills the Voice line of the system message in Step 5. The seed examples do the rest: a model copies the rhythm, length and level of detail of the descriptions it’s shown far more faithfully than it follows a list of rules, and every time you ban a phrase it reaches for the next one, so put your effort into choosing good examples rather than writing longer instructions.
Pick two or three descriptions you’d be happy to see on every product page, ideally from different product types, that explain what the product is, who it suits and what owning it is like in your store’s own words. Next, connect a Code node named Seed examples followed by a Data table node named Save seed examples (Row > Upsert on description_examples, matching on text). Because the seed rows teach the model your store’s tone before you have approved anything in Slack, replace these three items with the descriptions you picked:
// Replace these with two or three descriptions you already like from your own catalogue,
// one per product type. The model copies their tone and length, so pick your best.
return [
  { json: { category: 'Security Cameras', source: 'seed',
    text: "The TP-Link VIGI C540 is a 4MP outdoor camera that pans and tilts, so one camera mounted under the eaves can cover a driveway, a side gate and the yard. It suits anyone who wants clear colour footage after dark without putting up three fixed cameras.\n\nFull-colour night vision means you see the colour of a car or a jacket at night, not just grey shapes. Power it with PoE (Power over Ethernet, where one network cable carries both power and data) from a PoE switch or recorder, or use a 12V DC adaptor if it runs on its own. The 4mm lens gives a narrower, more detailed view than a wide-angle camera, which suits a gate or a path better than a whole yard." } },
  { json: { category: 'PoE Switches', source: 'seed',
    text: "The TP-Link TL-SG1008P is an 8-port Gigabit switch that powers up to four devices, such as cameras or Wi-Fi access points, over their network cables. It suits a small office or home network that has outgrown the router's built-in ports.\n\nFour of the ports are PoE+, and they share a 64W power budget, so add up what your devices draw before you plug them all in. The other four are standard Gigabit ports for computers, a printer or your router. There's nothing to set up: it's plug and play, in a steel desktop case that sits on a shelf or under a desk." } },
  { json: { category: 'Hard Drives', source: 'seed',
    text: "The WD Purple 4TB is a 3.5-inch hard drive built for recording around the clock in an NVR or DVR. It suits anyone adding storage to a camera system or replacing a drive that has filled up.\n\nIt connects over SATA at 6Gb/s, the connection most recorders use, so it fits a standard drive bay. How many days of footage 4TB holds depends on how many cameras you run, their resolution, and whether they record all the time or only on motion, so check your recorder's storage calculator before you buy." } }
];
Write settings
To begin the Write lane, add a Schedule Trigger named Every 3 hours and a Manual Trigger named Run now, wiring both into a Set node named Write settings (set to JSON mode). Running the schedule every three hours rather than every half hour keeps your monthly execution count low if you host on n8n Cloud. Paste this configuration into Write settings:
{
  "store_domain": "your-store.myshopify.com",
  "queue_tag": "describe",
  "product_ids": [],
  "batch_size": 5,
  "model": "gemma4:31b",
  "brand_voice": "Plain-spoken and friendly, like a shop assistant who knows the gear and likes it. Short sentences, everyday words, no hype.",
  "min_facts": 5,
  "min_words": 60,
  "max_chars_manufacturer": 5000,
  "max_chars_supplier": 1500,
  "manufacturer_url_namespace": "custom",
  "manufacturer_url_key": "manufacturer_url",
  "intro_ends_at": ["h1", "h2", "h3", "h4", "h5", "h6", "ul", "ol", "table", "dl", "div", "section", "figure", "img", "iframe", "video", "hr", "blockquote", "details"],
  "user_agent": "Mozilla/5.0 (compatible; YourStore product bot; +https://your-store.com)",
  "slack_channel": "#review-descriptions",
  "spec_words": ["spec", "dimension", "size", "weight", "material", "capacity", "power", "battery", "resolution", "lens", "port", "speed", "rating", "includes", "in the box", "compatib", "feature", "install", "mount"],
  "always_ok": ["RJ45", "H.264", "H.265", "Cat6", "802.3af", "802.3at", "19-inch", "USB-C", "24/7"],
  "banned_phrases": ["cutting-edge", "industry-leading", "seamless", "state-of-the-art", "best-in-class", "game changer", "look no further", "in today's world", "whether you're", "when it comes to", "warranty"],
  "strip_patterns": ["warranty", "free shipping", "ships within", "buy now"]
}
Most keys do what their names suggest: product_ids lets you test specific Shopify numeric IDs before using the describe tag ([] uses the tag), min_facts skips products with too few facts, min_words marks stub replies as failed, and max_chars_manufacturer and max_chars_supplier cap how much source text enters the prompt. The intro_ends_at list names the HTML tags where your intro stops (Step 2 explains how it’s used), so everything from the first of them downward stays untouched, while spec_words helps score paragraphs on manufacturer websites, always_ok allowlists common industry standards during the number check, and strip_patterns drops promotional or warranty sentences from the current description before the model sees them. Open Run once to set up, click Execute workflow and verify that the three seed rows appear inside the description_examples table and the Manufacturer page field shows on a product in the Shopify admin.
Step 2: Pull the products and their facts
Because n8n’s built-in Shopify node does not return product metafields, the Write lane uses two HTTP Request nodes to talk to Shopify’s GraphQL Admin API (2026-10). Connect Write settings to an HTTP Request node named Get Shopify token with these settings:
| Setting | Value |
|---|---|
| Method | POST |
| URL | https://{{ $('Write settings').first().json.store_domain }}/admin/oauth/access_token |
| Authentication | Generic Credential Type > Custom Auth ({"body": {"client_id": "...", "client_secret": "..."}}) |
| Body Content Type | Form Urlencoded |
| Body | grant_type = client_credentials |
| Settings | Execute Once on, Retry On Fail on (3 tries) |
Next, add an HTTP Request node named Get products to describe (Method POST, URL https://{{ $('Write settings').first().json.store_domain }}/admin/api/2026-10/graphql.json, header X-Shopify-Access-Token set to {{ $('Get Shopify token').first().json.access_token }}, Body JSON). The query reads descriptionHtml rather than plain text, because the lists and tables already in a description count as facts and the code needs the HTML to find where the intro ends. Shopify’s standard product attributes are stored as metaobject references rather than plain strings, so the query also fetches reference and references display names alongside standard metafield values because a raw gid://shopify/Metaobject/... ID means nothing to a language model. Use this GraphQL query:
query ProductsToDescribe($q: String!, $n: Int!, $ns: String!, $key: String!) {
  products(first: $n, query: $q) {
    nodes {
      id
      title
      vendor
      productType
      category { name }
      onlineStorePreviewUrl
      descriptionHtml
      hasOnlyDefaultVariant
      options { name values }
      featuredMedia { preview { image { url } } }
      manufacturerUrl: metafield(namespace: $ns, key: $key) { value }
      metafields(first: 50) {
        nodes {
          namespace
          key
          type
          value
          definition { name }
          reference { ... on Metaobject { displayName } }
          references(first: 10) { nodes { ... on Metaobject { displayName } } }
        }
      }
    }
  }
}
The node’s JSON body is one expression, {{ JSON.stringify({ query: ..., variables: ... }) }}, with the query above and these variables, which pull either your test product_ids or products carrying the describe tag:
{{ (s => ({ q: s.product_ids.length ? s.product_ids.map(id => 'id:' + id).join(' OR ') : 'tag:' + s.queue_tag, n: s.batch_size, ns: s.manufacturer_url_namespace, key: s.manufacturer_url_key }))($('Write settings').first().json) }}Connect a Split Out node named Split out products (with Fields To Split Out set to data.products.nodes), followed by a Loop Over Items node with Batch Size set to 1, because the Basic LLM Chain node downstream does not preserve n8n’s item pairing across multi-item batches. From the loop output of Loop Over Items, connect a Code node named Build the facts (Mode Run Once for Each Item). This node formats one Label: value line per metafield, finds where the current intro ends and reads the lists and tables below it as more spec lines, strips warranty and shipping sentences out of the existing copy so the model uses it only for factual details rather than copying its phrasing, and checks whether the product has at least min_facts facts:
const s = $('Write settings').first().json;
const p = $json;
const decode = t => String(t || '').replace(/ /g, ' ').replace(/"/g, '"').replace(/'|’/g, "'")
.replace(/</g, '<').replace(/>/g, '>').replace(/&/g, '&');
const clean = t => decode(t).replace(/[{}]/g, '').replace(/\s+/g, ' ').trim();
const text = h => clean(String(h || '').replace(/<[^>]+>/g, ' '));
const re = t => t.replace(/[.*+?^${}()|[\]\\]/g, '\\$&');
// Where the intro ends: at the first heading, list, table or other block named in intro_ends_at.
// A wrapper around the whole description is looked inside, and a short label paragraph
// right before the block ("Specifications:", or all bold) stays with the block it introduces.
const splitIntro = (html, tags) => {
let pre = '', post = '', body = String(html || '');
for (;;) {
const m = body.match(/^\s*(<(div|section|article)\b[^>]*>)([\s\S]*)(<\/\2>)\s*$/i);
if (!m) break;
let depth = 0, whole = true;
for (const x of m[3].matchAll(new RegExp('<(/?)' + m[2] + '\\b', 'gi'))) {
depth += x[1] ? -1 : 1;
if (depth < 0) { whole = false; break; }
}
if (!whole || depth !== 0) break;
pre += m[1]; post = m[4] + post; body = m[3];
}
let at = body.search(new RegExp('<(' + tags.join('|') + ')(?=[\\s>/])', 'i'));
if (at < 0) return { pre, intro: body, rest: '', post, found: false };
const before = body.slice(0, at);
const lastP = before.search(/<p\b[^>]*>(?:(?!<p\b)[\s\S])*$/i);
if (lastP >= 0) {
const para = before.slice(lastP).trim();
const words = para.replace(/<[^>]+>/g, '').trim();
if (words.length <= 80 && (/:$/.test(words) || /^<p\b[^>]*>\s*<(strong|b)\b[\s\S]*<\/(strong|b)>\s*(<\/p>)?$/i.test(para))) at = lastP;
}
return { pre, intro: body.slice(0, at), rest: body.slice(at), post, found: true };
};
// One "Label: value" line per metafield. Standard product attributes are metaobject references,
// so use their display names: a raw ID means nothing to the model.
const valueOf = m => {
const refs = ((m.references && m.references.nodes) || []).map(r => r.displayName).filter(Boolean);
if (refs.length) return refs.join(', ');
if (m.reference && m.reference.displayName) return m.reference.displayName;
let v = m.value;
try {
const j = JSON.parse(v);
if (Array.isArray(j)) v = j.join(', ');
else if (j && j.value !== undefined) v = j.value + (j.unit ? ' ' + String(j.unit).toLowerCase().replace(/_/g, ' ') : '');
} catch (e) { /* plain text */ }
return clean(v);
};
const lines = [];
for (const m of p.metafields.nodes) {
if (m.namespace === s.manufacturer_url_namespace && m.key === s.manufacturer_url_key) continue;
if (/rich_text|json|file_reference|url|collection_reference|product_reference/.test(m.type)) continue;
const v = valueOf(m);
if (!v || v.startsWith('gid://') || v.length > 200) continue;
const line = '- ' + clean(m.definition ? m.definition.name : m.key) + ': ' + v;
if (!lines.includes(line)) lines.push(line);
}
if (!p.hasOnlyDefaultVariant) for (const o of p.options) lines.push('- ' + clean(o.name) + ': ' + o.values.map(clean).join(', '));
// The intro is what gets replaced; lists and tables below it are facts too
const parts = splitIntro(p.descriptionHtml, s.intro_ends_at);
const rows = [...new Set([...parts.rest.matchAll(/<(li|tr)\b[^>]*>([\s\S]*?)<\/\1>/gi)]
.map(m => text(m[2].replace(/<\/t[dh]>\s*<t[dh][^>]*>/gi, ': '))).filter(r => r.length > 1 && r.length <= 200))].slice(0, 40);
const facts = lines.length + rows.length;
// Supplier copy is a source of facts, not of wording: drop warranty, delivery and sales sentences
const strip = new RegExp(s.strip_patterns.map(re).join('|'), 'i');
const prose = text((parts.intro + parts.rest.replace(/<(li|tr|h\d)\b[^>]*>[\s\S]*?<\/\1>/gi, ' ')).replace(/<\/(p|div)>/gi, '. '));
const supplier = prose.split(/(?<=[.!?])\s+/).filter(x => x.replace(/[.\s]/g, '') && !strip.test(x)).join(' ').replace(/\.\s*\./g, '.').slice(0, s.max_chars_supplier);
const intro = text(parts.intro);
const thin = facts < s.min_facts;
return { json: {
product_id: p.id, title: clean(p.title), vendor: clean(p.vendor),
category: p.productType || (p.category && p.category.name) || 'default',
image: p.featuredMedia && p.featuredMedia.preview && p.featuredMedia.preview.image ? p.featuredMedia.preview.image.url : '',
admin_url: 'https://' + s.store_domain + '/admin/products/' + p.id.split('/').pop(),
preview_url: p.onlineStorePreviewUrl || '',
manufacturer_url: (p.manufacturerUrl && p.manufacturerUrl.value) || '',
specs: lines.join('\n'), desc_specs: rows.map(r => '- ' + r).join('\n'), supplier_copy: supplier,
old_intro: intro.slice(0, 500),
intro_mode: !parts.found ? 'replace_all' : intro ? 'replace_intro' : 'insert',
kept_preview: text(parts.rest).slice(0, 80),
facts, status: thin ? 'needs_specs' : 'writing',
error: thin ? 'only ' + facts + ' spec lines; add specs and tag it again' : ''
} };Where the intro ends
The splitIntro function at the top of Build the facts decides what counts as the intro, and Merge the intro in Step 9 runs the same function on the live description, so the card and the push always agree. It looks for the first tag named in intro_ends_at (any heading, list, table, div block, image, embed or horizontal rule by default) and treats everything above it as the intro. Two cases needed extra care in testing. Many supplier imports wrap the whole description in one <div>, which would otherwise make the intro empty, so a wrapper that holds the entire description is looked inside first and put back around the result. And a short paragraph right above a list or table, such as <p><strong>Specifications:</strong></p>, is a label for that block rather than intro copy, so a paragraph of 80 characters or fewer that ends in a colon or is entirely bold stays with the block.
That leaves three outcomes, which the card states before you approve. A description that opens with paragraphs gets those paragraphs replaced (replace_intro); one that opens with a list or table keeps all of it and gets the new intro on top (insert); and one that is only paragraphs, with no lists, tables or headings at all, is replaced whole (replace_all). If your own intros contain a bullet list, take ul and ol out of intro_ends_at.
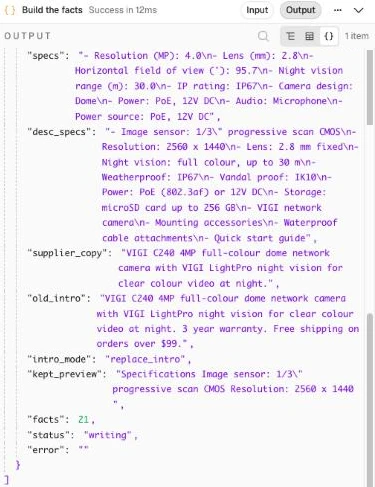
Connect an If node named Enough facts? checking whether {{ $json.status === 'writing' }} is true. Asking a language model to write a description from a product title alone is the single biggest cause of invented specifications, so any product with fewer than five spec lines takes the false branch straight to Save without a card (saved with status needs_specs) and Remove the tag, letting you fill in the missing metafields and tag it describe again later. Run a test with the TP-Link VIGI C240(2.8mm) 4MP Full-Color Dome Network Camera and confirm that Build the facts outputs status: "writing", a facts count well above min_facts (21 on our test product: nine from metafields and twelve from the lists in its description), spec lines for its resolution, lens, night vision range, IP rating and power options, and intro_mode: "replace_intro", because its description opens with a supplier paragraph and then an <h3>Specifications</h3> list.
Step 3: Add examples from the same category
From the true output of Enough facts?, add a Data table node named Get examples followed by a Code node named Collect examples (Mode Run Once for All Items). Showing the model two or three approved descriptions from the same product category teaches your rhythm and level of detail far better than piling on extra prompt rules; the companion guide, Product Title Optimisation With AI, explains why in-category examples beat long rule lists. Configure Get examples with these settings:
| Setting | Value |
|---|---|
| Resource / Operation | Row > Get |
| Data table | description_examples |
| Must Match | Any Condition |
| Conditions | category equals {{ $json.category }}; source equals seed |
| Limit | 20 |
| Order By | createdAt, descending |
| Settings | Always Output Data on, so a new category doesn’t stop the loop |
In Collect examples, the code picks up to three approved examples matching the current product’s category (newest first), or falls back to two seed rows when a category has no approved descriptions yet:
const p = $('Build the facts').first().json;
const rows = $input.all().map(i => i.json).filter(r => r.text);
// Up to three from the same product type, newest first; the seeds when the type has none yet
const same = rows.filter(r => r.category === p.category).slice(0, 3);
const pick = same.length ? same : rows.filter(r => r.source === 'seed').slice(0, 2);
const examples = pick.map((r, i) => 'Example ' + (i + 1) + ' (' + r.category + '):\n' + r.text.replace(/[{}]/g, '')).join('\n\n');
return [{ json: { ...p, examples } }];
Step 4: Read the manufacturer’s page and keep the useful parts
A raw manufacturer web page is mostly navigation menus, comparisons with sibling models, and footer links, so feeding the whole HTML document into your prompt wastes tokens and tempts the model into pulling specs from a “Related Products” carousel. By caching a trimmed version in source_pages, redrafting a product never fetches the website twice, and any product without a manufacturer page simply skips the fetch and writes from your Shopify specs and supplier copy alone. For manufacturer websites that block a plain HTTP request, routing the call through a scraping API such as Firecrawl is an easy upgrade (the competitor price monitoring guide in this series uses one); in our tests StarTech.com’s page answered a plain request with a 403, so that product was written from its specs alone.
After Collect examples, add a Data table node named Get cached page (Row > Get on source_pages, where url equals {{ $json.manufacturer_url }}, Limit 1, Always Output Data on) and connect it to an If node named Fetch the page? that checks whether {{ !$json.focused_text && !!$('Collect examples').first().json.manufacturer_url }} is true. On the true branch, connect an HTTP Request node named Fetch manufacturer page with these settings:
| Setting | Value |
|---|---|
| Method | GET |
| URL | {{ $('Collect examples').first().json.manufacturer_url }} |
| Header | User-Agent = {{ $('Write settings').first().json.user_agent }} |
| Options > Response | Response Format Text, Put Output in Field html |
| Options > Timeout | 20000 |
| Settings > On Error | Continue |
Next, connect Fetch manufacturer page to a Markdown node named Page to Markdown configured as follows:
| Setting | Value |
|---|---|
| Mode | HTML to Markdown |
| HTML | {{ $json.html || '' }} |
| Destination Key | markdown |
| Options > Ignored Elements | nav,header,footer,script,style,form,noscript,svg |
Connect Page to Markdown to a Code node named Focus the page (Mode Run Once for All Items), which strips image tags and link-only menu lines, groups the Markdown into chunks of roughly 700 characters, scores each chunk by how many spec_words (matched at the start of a word, so port doesn’t score every “Support” link in a menu) and digits it contains, and keeps the highest-scoring paragraphs in their original page order up to max_chars_manufacturer:
const s = $('Write settings').first().json;
const url = $('Collect examples').first().json.manufacturer_url;
const md = String($input.first().json.markdown || '');
const re = t => t.replace(/[.*+?^${}()|[\]\\]/g, '\\$&');
const SPEC = new RegExp('\\b(' + s.spec_words.map(re).join('|') + ')', 'gi'); // word starts: 'port' isn't 'Support'

// Drop image lines and lines that are only links (menus); keep link text, lose the URL
const cleaned = md.split('\n').filter(l => {
  const t = l.trim().replace(/\\([\[\]])/g, '$1');
  return !/^!\[/.test(t) && !/^([*\-+]|\d+\.)?\s*(\[[^\]]*\](\([^)]*\))?\s*)+$/.test(t);
}).join('\n').replace(/!\[[^\]]*\]\([^)]*\)/g, '').replace(/\]\([^)]*\)/g, ']').replace(/\n{3,}/g, '\n\n');

const focus = (text, budget) => {
  if (text.length <= budget) return text;
  const pieces = [];
  for (const para of text.split(/\n{2,}/)) {
    if (pieces.length && pieces[pieces.length - 1].length + para.length < 700) pieces[pieces.length - 1] += '\n\n' + para;
    else pieces.push(para);
  }
  const scored = pieces.map((p, i) => ({ i, p,
    sc: (((p.match(SPEC) || []).length * 3 + (p.match(/\d/g) || []).length / 15)
      - ((p.match(/\]/g) || []).length > 8 ? 5 : 0)) / Math.max(1, Math.sqrt(p.length / 300)) }))
    .sort((a, b) => b.sc - a.sc);
  const keep = []; let used = 0;
  for (const c of scored) { if (c.sc <= 0 || used + c.p.length > budget) continue; keep.push(c); used += c.p.length; }
  return keep.sort((a, b) => a.i - b.i).map(c => c.p).join('\n...\n');
};

const focused = focus(cleaned, s.max_chars_manufacturer).replace(/[{}]/g, '').trim();
return [{ json: { url, focused_text: focused, fetched_at: new Date().toISOString(), status: focused ? 'ok' : 'empty' } }];
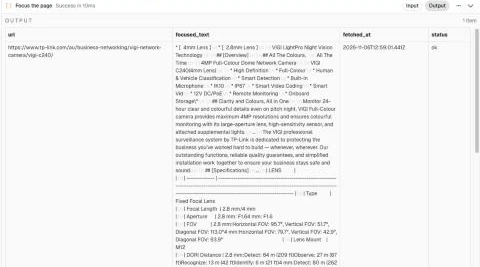
Wire the output of Focus the page both to a Data table node named Save the page (Row > Upsert on source_pages, matching url, mapping url to {{ $json.url }}, focused_text to {{ $json.focused_text }}, fetched_at to {{ $json.fetched_at }}, and status to {{ $json.status }}) and directly to Build the prompt, while also wiring the false branch of Fetch the page? straight into Build the prompt. When you inspect the output of Focus the page for the VIGI C240, you should see the camera’s feature and specification paragraphs with all site navigation and footer links removed.
Step 5: Write the draft
Add a Code node named Build the prompt (Mode Run Once for All Items) to assemble the product title, brand, product type, spec lines from metafields and from the description’s lists, focused manufacturer text, cleaned supplier copy, and examples, alongside a combined context string that the fact-checker will inspect in the next step:
const p = $('Collect examples').first().json;
const page = String($input.first().json.focused_text || '');
const prompt = [
  'PRODUCT: ' + p.title,
  'Brand: ' + p.vendor + ' | Product type: ' + p.category,
  '',
  'SPECS',
  [p.specs, p.desc_specs].filter(Boolean).join('\n') || '(none)',
  '',
  'MANUFACTURER TEXT',
  page || '(none)',
  '',
  'SUPPLIER COPY',
  p.supplier_copy || '(none)',
  '',
  'APPROVED EXAMPLES (voice and shape only, different products, never copy their facts)',
  p.examples || '(none)'
].join('\n');
return [{ json: { ...p, prompt, context: [p.title, p.vendor, p.specs, p.desc_specs, page, p.supplier_copy].join('\n') } }];
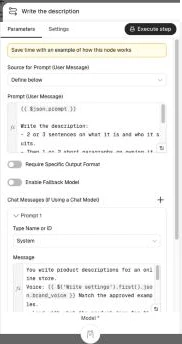
Connect Build the prompt to a Basic LLM Chain node named Write the description (with Source for Prompt set to Define below). Rather than asking for JSON, the prompt asks for plain paragraphs separated by a blank line, which matches the exact format you edit in Slack, avoids output-parser failures, and prevents curly braces from breaking n8n’s prompt template engine. Set the User Message prompt to:
{{ $json.prompt }}

Write the description:
- 2 or 3 sentences on what it is and who it suits.
- Then 1 or 2 short paragraphs on owning it and setting it up.
80 to 150 words in total. No bullet list: the page already lists the specs below your text.
Use only numbers that appear above.
Separate paragraphs with a blank line and return nothing else.
Under Chat Messages, add a System message and keep it brief so the approved examples do the heavy lifting for tone. The Voice line reads brand_voice from Write settings, so you change your store’s voice in one place:
You write product descriptions for an online store.
Voice: {{ $('Write settings').first().json.brand_voice }} Match the approved examples.
- Lead with what the product does for the buyer.
- Fit use cases to where the product is made to be used.
- Explain a technical term the first time you use it.
- State facts only from the specs and source text. Never invent a number or a feature.
- No warranty, shipping or price. No em dashes.
In the settings of Write the description, turn Retry On Fail on (2 tries), set On Error to Continue (using error output), and wire both the regular output and the error output into Check the draft so any model timeout or API error is logged cleanly in your table as failed with the reason rather than halting the batch. Attach an Ollama Chat Model sub-node (using credentials with Base URL https://ollama.com and your API key) configured with these values:
| Setting | Value |
|---|---|
| Model | {{ $('Write settings').first().json.model }} |
| Sampling Temperature | 0.5 |
We default to gemma4:31b at temperature 0.5, the same model the sibling titles template uses, with the temperature a little higher because multi-paragraph copy needs more variety than a title. We timed it against the larger gpt-oss:120b on four test products, three runs each, with identical prompts. Neither model wrote a number the check flagged in its 12 drafts, but gemma4:31b kept every draft inside 80 to 150 words (88 to 134) and answered in 0.9 to 3.7 seconds, about 1.2 seconds typically, while gpt-oss:120b ran past 150 words on half its drafts, added claims like “without distortion” that neither source made, and took 2.0 to 7.5 seconds, about 3.5 typically, because it reasons before it answers. On the VIGI C240 prompt, Ollama’s own counts were 1,617 input and about 190 output tokens for gemma4:31b, against 1,502 input and 1,063 to 3,514 output tokens for gpt-oss:120b, most of them hidden reasoning, which makes the larger model roughly five times the cost per description. If drafts start dropping facts on long spec sheets, gpt-oss:120b is still the larger model to try. Check the output of Write the description on the VIGI C240 and confirm it returns two or three plain-text paragraphs between 80 and 150 words.
Step 6: Check every number in code
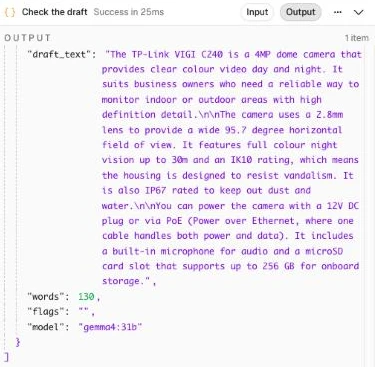
Even when every spec is right there in the prompt, language models still slip in plausible-sounding figures from their training data. On a store I run, 240 of 1,026 drafts (23%) had at least one flagged number, a share that included industry standards like rack sizes and video codecs before they were added to the always_ok allowlist. When gemma4:31b wrote the 130-word draft for the TP-Link VIGI C240(2.8mm) 4MP Full-Color Dome Network Camera, it produced these three paragraphs:
The TP-Link VIGI C240 is a 4MP dome camera that provides clear colour video day and night. It suits business owners who need a reliable way to monitor indoor or outdoor areas with high definition detail.
The camera uses a 2.8mm lens to provide a wide 95.7 degree horizontal field of view. It features full colour night vision up to 30m and an IK10 rating, which means the housing is designed to resist vandalism. It is also IP67 rated to keep out dust and water.
You can power the camera with a 12V DC plug or via PoE (Power over Ethernet, where one cable handles both power and data). It includes a built-in microphone for audio and a microSD card slot that supports up to 256 GB for onboard storage.
Every number and code in that draft (4, 2.8, 95.7, 30, IK10, IP67, 12, and 256) appeared in the camera’s specs or on TP-Link’s page, so the card showed no flags, and across 24 drafts on ten test products gemma4:31b didn’t write a single number the check had to flag. The check earns its place on the drafts that do slip, and a flag is not always a wrong fact. On this same camera, a larger model once turned the page’s “15-ft radius” for the microphone into “within about 4.5 m”, and the check flagged 4.5 because the sources only gave feet: a reasonable conversion, but one you want a person to confirm. Likewise, when a draft for the StarTech.com CABSHELF1U7V 7in Deep Vented 1U Rack Shelf said “Mount it in a standard 19-inch rack”, the check flagged 19 because none of its sources mentioned it. Because 19-inch is the universal rack width standard, adding 19-inch to always_ok in Write settings lets it pass without loosening the number check for everything else, and sending flags as warnings on the Slack card rather than blocking the draft lets a human reviewer make the call (and spot non-numeric exaggerations, such as “designed to resist vandalism” standing in for a plain IK10 rating, at the same time).
Connect both outputs of Write the description to a Code node named Check the draft (Mode Run Once for All Items). It strips <think> blocks, removes stray Markdown bullets or bolding, converts em or en dashes into commas, checks alphanumeric model codes as whole tokens, verifies every standalone number against p.context as written (a 4.0 in a metafield counts as 4, but 79 doesn’t pass for 79.7, and 5 doesn’t pass just because the sources mention 5.4 W), scans for banned_phrases, and marks empty or short replies as failed:
const s = $('Write settings').first().json;
const p = $('Build the prompt').first().json;
const r = $input.first().json;
const reply = String(r.text || '').replace(/<think>[\s\S]*?<\/think>/g, '').trim();

const re = t => t.replace(/[.*+?^${}()|[\]\\]/g, '\\$&');
const fix = t => t.replace(/[\u2010\u2011\u2012\u00AD]/g, '-').replace(/\s*[\u2013\u2014]\s*/g, ', ').replace(/[ \t]+/g, ' ').trim();
const squash = t => String(t).toLowerCase().replace(/[\s\-.]/g, '');

// Paragraphs split on blank lines; stray bullets, headings and bold removed; dashes become commas
const paras = reply.split(/\n\s*\n/)
  .map(x => fix(x.replace(/^\s*(#+|[-*]|\d+\.)\s+/gm, '').replace(/\*\*/g, '').replace(/\n/g, ' ')))
  .filter(Boolean);
const plain = paras.join(' ');
const words = plain.split(/\s+/).filter(Boolean).length;

// Standards in always_ok pass even when the sources don't name them
let scan = plain;
const loose = t => t.split(/[-.\s]+/).map(re).join('[-.\\s]?');
for (const t of s.always_ok) scan = scan.replace(new RegExp('(^|[^A-Za-z0-9])' + loose(t) + '(?![A-Za-z0-9])', 'gi'), '$1 ');

// Codes such as IP67 match whole, ignoring spaces, hyphens and dots; every other number must be in the
// sources as written (4.0 counts as 4, but 79 isn't 79.7 and 5 isn't the 5 in 5.4)
const ctx = p.context.replace(/(\d),(?=\d{3})/g, '$1');
const ctxN = ctx.replace(/(\d)\.0+(?![0-9])/g, '$1');
const ctxS = squash(ctx);
const codes = [];
scan = scan.replace(/(\d),(?=\d{3})/g, '$1')
  .replace(/\b[A-Za-z]+-?\.?\d+(?:\.\d+)*[A-Za-z]*\b/g, m => { codes.push(m); return ' '; });
const nums = [...new Set(scan.match(/\d+(?:\.\d+)?/g) || [])];
const badNums = nums.filter(n => !new RegExp('(^|[^0-9.])' + re(n.replace(/\.0+$/, '')) + '(?![0-9]|[.,][0-9])').test(ctxN));
const badCodes = [...new Set(codes)].filter(c => !ctxS.includes(squash(c)));

const banned = s.banned_phrases.filter(b => new RegExp('\\b' + re(b) + '\\b', 'i').test(plain));
const flags = [];
if (badNums.length || badCodes.length) flags.push('numbers not in sources: ' + [...badNums, ...badCodes].join(', '));
if (banned.length) flags.push('phrases: ' + banned.join(', '));

let error = '';
if (r.error) error = 'model call failed: ' + String(r.error.message || r.error).slice(0, 200);
else if (!paras.length) error = 'no text in the reply';
else if (words < s.min_words) error = 'too short (' + words + ' words)';

return [{ json: { ...p,
  draft_text: paras.join('\n\n'), words, flags: flags.join('; '), model: s.model,
  status: error ? 'failed' : 'pending', error
} }];
To test the check, pin a reply on Write the description with an extra sentence such as “The built-in mic hears sound within about 4.5 m.”, run Check the draft, and confirm the output shows flags: "numbers not in sources: 4.5" and status: "pending".
Step 7: Send each draft to Slack with an edit box
Instead of opening a pop-up modal when you click an Edit button (which needs Slack’s trigger_id, and that expires three seconds after the click), the card places a multiline plain_text_input element directly inside the message. When you edit the text in place and click Approve, Slack includes the current contents of that input box inside the state.values object of the block_actions payload, and because Slack caps a plain_text_input at 3,000 characters, the expression slices initial_value to 2,900 characters. Also note how the second section of the card says which of the three intro cases from Step 2 applies, so you know before you click Approve whether the whole description will be replaced, and the context line shows the start of what is kept below.
After Check the draft, add an If node named Usable? checking whether {{ $json.status === 'pending' }} is true. On the true branch, add a Slack node named Post the card (Message > Send, Send Message To Channel {{ $('Write settings').first().json.slack_channel }}, Message Type Blocks, Notification Text Description to review: {{ $json.title }}) with this Blocks expression:
{{ JSON.stringify({ blocks: [
  Object.assign(
    { type: 'section', text: { type: 'mrkdwn', text: '*' + $json.title + '*\n' + $json.category } },
    $json.image ? { accessory: { type: 'image', image_url: $json.image, alt_text: $json.title.slice(0, 100) } } : {}),
  { type: 'section', text: { type: 'mrkdwn', text: {
      replace_intro: '*Current intro* (everything below it stays):\n' + $json.old_intro,
      insert: '*Current intro:* none. The new intro goes above the description, which stays as it is.',
      replace_all: '*Current description* (no lists, tables or headings, so all of it will be replaced):\n' + ($json.old_intro || '(empty)')
    }[$json.intro_mode] } },
  { type: 'input', block_id: 'field_description', optional: true,
    label: { type: 'plain_text', text: 'Proposed intro (edit if needed, then Approve)' },
    element: { type: 'plain_text_input', action_id: 'edit_description', multiline: true, initial_value: $json.draft_text.slice(0, 2900) } },
  { type: 'context', elements: [{ type: 'mrkdwn', text: $json.model + ' · ' + $json.words + ' words · ' +
    ($json.flags ? ':warning: ' + $json.flags : 'no flags') +
    ($json.kept_preview ? ' · kept below: ' + $json.kept_preview : '') }] },
  { type: 'actions', elements: [
    { type: 'button', text: { type: 'plain_text', text: 'Edit in Shopify' }, url: $json.admin_url, action_id: 'link_admin' },
    ...($json.preview_url ? [{ type: 'button', text: { type: 'plain_text', text: 'Preview' }, url: $json.preview_url, action_id: 'link_preview' }] : []),
    { type: 'button', style: 'primary', text: { type: 'plain_text', text: 'Approve' }, action_id: 'desc_approve', value: $json.product_id },
    { type: 'button', style: 'danger', text: { type: 'plain_text', text: 'Reject' }, action_id: 'desc_reject', value: $json.product_id }
  ] }
] }) }}
Connect Post the card to a Data table node named Save the draft (Row > Upsert on description_drafts, matching product_id), mapping product_id, title, category, old_intro, intro_mode, draft_text, flags, words, and model from {{ $('Check the draft').first().json.<column> }}, plus status set to pending, edited set to false, slack_channel set to {{ $json.channel }}, and slack_ts set to {{ $json.message_timestamp }}. For the false branches of both Enough facts? and Usable?, wire them into a Data table node named Save without a card (Row > Upsert on description_drafts, matching product_id, saving product_id, title, category, old_intro, intro_mode, draft_text as {{ $json.draft_text || '' }}, flags, words, model, status as {{ $json.status }}, and error as {{ $json.error }}), so failed drafts get no Slack card and log their error reason in the table.
Connect Save without a card to an If node named Model error? ({{ String($json.error || '').startsWith('model call failed') }} is true): a failed model call goes straight back to Loop Over Items, so the product keeps its tag and the next run tries again, while needs_specs and other failures carry on. Connect Save the draft, and the false branch of Model error?, to an HTTP Request node named Remove the tag (using the same GraphQL URL and X-Shopify-Access-Token header as Get products to describe, with variables { id: $('Build the facts').first().json.product_id, tags: [$('Write settings').first().json.queue_tag] }) and wire its output back to Loop Over Items. Use this mutation in Remove the tag:
mutation Done($id: ID!, $tags: [String!]!) {
  tagsRemove(id: $id, tags: $tags) { userErrors { field message } }
}
Check Slack after a test run to confirm the VIGI C240 card arrives with the editable text box and no flags · kept below: Specifications in its context line.
Step 8: Handle Approve and Reject
In the Review lane, add a Webhook node named Slack button click (HTTP Method POST, Path description-review, Respond set to Using 'Respond to Webhook' Node, and Options > Raw Body turned on), paste its production URL into your Slack app’s Interactivity Request URL, and connect it immediately to a Respond to Webhook node named Respond to Slack (set to Respond With No Data so Slack gets its response within three seconds). Connect Respond to Slack to a Code node named Read the click (Mode Run Once for All Items), which parses the URL-encoded payload, ignores clicks on the external Shopify and Preview link buttons, and extracts the current text from the edit_description input box:
const raw = (await this.helpers.getBinaryDataBuffer(0, 'data')).toString('utf8');
const h = $input.first().json.headers;
if (Math.abs(Date.now() / 1000 - Number(h['x-slack-request-timestamp'])) > 300) throw new Error('Stale request');
const field = raw.split('&').find(kv => kv.startsWith('payload=')) || ''; // no URLSearchParams in the Code node
const b = JSON.parse(decodeURIComponent(field.slice(8).replace(/\+/g, ' ')));
const a = b.actions[0];
if (!a.action_id.startsWith('desc_')) return []; // Edit in Shopify and Preview are links: nothing to do

// The edit box arrives with the button click; tags are stripped because Push escapes the text
const box = ((((b.state || {}).values || {}).field_description || {}).edit_description) || {};
const text = String(box.value || '').replace(/<[^>]*>/g, '').replace(/\r/g, '').trim();
return [{ json: {
  base: `v0:${h['x-slack-request-timestamp']}:${raw}`, expected: h['x-slack-signature'],
  action: a.action_id.replace('desc_', ''), product_id: a.value, text,
  user: b.user.username, channel: b.channel.id, ts: b.message.ts
} }];
Connect Read the click to a Crypto node named Sign the request (Action Hmac, Type SHA256, Value {{ $json.base }}, Property Name sig, Encoding HEX, using your Slack signing secret credential) and an If node named Signature valid? ({{ 'v0=' + $json.sig === $json.expected }} is true); the companion guide, Product Title Optimisation With AI, explains how this HMAC verification works in detail. Next, add a Data table node named Get pending draft (Row > Get on description_drafts, matching all conditions product_id equals {{ $('Read the click').first().json.product_id }} and status equals pending, Limit 1) so a second click on an already-decided card finds nothing and stops, then wire it to a Switch node named Route the click with an Approve output ({{ $('Read the click').first().json.action === 'approve' }}) and a Reject output ({{ $('Read the click').first().json.action === 'reject' }}).
On the Approve branch, add a Data table node named Mark approved (Row > Update on description_drafts where product_id equals {{ $json.product_id }}) with these column values, which keep the original draft_text if someone clears the box completely:
| Column | Value |
|---|---|
status | approved |
final_text | {{ $('Read the click').first().json.text || $json.draft_text }} |
edited | {{ !!$('Read the click').first().json.text && $('Read the click').first().json.text.replace(/\s+/g, ' ') !== $json.draft_text.replace(/\s+/g, ' ') }} |
Connect Mark approved to an Execute Workflow node named Send to Push lane (Source Database, Workflow By ID {{ $workflow.id }}, passing input product_id = {{ $('Read the click').first().json.product_id }}, Mode Run once with all items, and Options > Wait For Sub-Workflow Completion turned off; referencing $workflow.id means the call still works when someone imports the template into a new n8n instance). On the Reject branch, add a Data table node named Mark rejected (Row > Update, same match, setting status to rejected), and wire both Send to Push lane and Mark rejected into a Slack node named Show the decision (Message > Update, Channel by ID {{ $('Read the click').first().json.channel }}, Message Timestamp {{ $('Read the click').first().json.ts }}, Message Type Blocks, Options > Include Link to Workflow off) to replace the input box and buttons with the final decision:
{{ (() => {
  const c = $('Read the click').first().json;
  const d = $('Get pending draft').first().json;
  const approved = c.action === 'approve';
  const text = approved ? (c.text || d.draft_text) : d.draft_text;
  return JSON.stringify({ blocks: [
    { type: 'section', text: { type: 'mrkdwn', text: '*' + d.title + '*\n' + text.slice(0, 2900) } },
    { type: 'context', elements: [{ type: 'mrkdwn', text: approved
      ? ':white_check_mark: Approved by @' + c.user + '. Pushing to Shopify now.'
      : ':no_entry: Rejected by @' + c.user + '. Shopify was not changed.' }] }
  ] });
})() }}
Reword a sentence of the VIGI C240 draft in the Slack card (we changed “It suits business owners who need a reliable way to monitor indoor or outdoor areas with high definition detail.” to “It suits a shop, office or home that needs a clear view indoors or out.”), click Approve, and check description_drafts to confirm the row now shows status: "approved" and edited: true.
Step 9: Push the intro to Shopify without touching the specs
In most established stores, the bottom half of descriptionHtml already holds an accurate specification table, size chart, or care guide, and overwriting the entire field destroys that formatting. The Push lane reads the current live HTML from Shopify right before updating, converts your approved plain text into <p> tags, and swaps the new intro in for the old one using the same splitIntro function as Build the facts (Step 2), so every heading, list, table and block below the intro stays exactly as it was.
Start the Push lane with a When Executed by Another Workflow trigger (configured with workflow input product_id of type String) alongside a Schedule Trigger named Every hour (which acts as a backstop for any row left in approved), wiring both into a Set node named Push settings (Mode JSON). Keep intro_ends_at the same as in Write settings, and set dry_run to true if you want your first test run to save the merged HTML into description_drafts without touching Shopify:
{
  "store_domain": "your-store.myshopify.com",
  "intro_ends_at": ["h1", "h2", "h3", "h4", "h5", "h6", "ul", "ol", "table", "dl", "div", "section", "figure", "img", "iframe", "video", "hr", "blockquote", "details"],
  "dry_run": false
}
Connect Push settings to Get Shopify token for Push (identical to Get Shopify token, reading store_domain from Push settings), then to a Data table node named Get approved drafts (Row > Get on description_drafts, status equals approved, Limit 25), and then to a Filter node named Only this product that keeps items where {{ !$('When Executed by Another Workflow').isExecuted || $json.product_id === $('When Executed by Another Workflow').first().json.product_id }} is true. When triggered from Slack, it pushes only the product you just approved; when triggered by the hourly schedule, it pushes every row still waiting in approved.
Next, add an HTTP Request node named Read the live description (calling https://{{ $('Push settings').first().json.store_domain }}/admin/api/2026-10/graphql.json with token {{ $('Get Shopify token for Push').first().json.access_token }} and variables { id: $json.product_id }) using this query:
query Live($id: ID!) {
  product(id: $id) { descriptionHtml onlineStoreUrl onlineStorePreviewUrl }
}
Connect Read the live description to a Code node named Merge the intro (Mode Run Once for Each Item), which HTML-escapes the approved text, converts double line breaks into <p> tags, turns single line breaks into <br>, formats - lines as <ul> lists if you typed any in the Slack edit box, and puts back everything from the end of the intro down, inside any wrapper that held the whole description:
const s = $('Push settings').first().json;
const d = $('Only this product').item.json;
const product = ($json.data && $json.data.product) || {};
const live = String(product.descriptionHtml || '');
const esc = t => String(t).replace(/&/g, '&').replace(/</g, '<').replace(/>/g, '>');
// Where the intro ends: at the first heading, list, table or other block named in intro_ends_at.
// A wrapper around the whole description is looked inside, and a short label paragraph
// right before the block ("Specifications:", or all bold) stays with the block it introduces.
const splitIntro = (html, tags) => {
let pre = '', post = '', body = String(html || '');
for (;;) {
const m = body.match(/^\s*(<(div|section|article)\b[^>]*>)([\s\S]*)(<\/\2>)\s*$/i);
if (!m) break;
let depth = 0, whole = true;
for (const x of m[3].matchAll(new RegExp('<(/?)' + m[2] + '\\b', 'gi'))) {
depth += x[1] ? -1 : 1;
if (depth < 0) { whole = false; break; }
}
if (!whole || depth !== 0) break;
pre += m[1]; post = m[4] + post; body = m[3];
}
let at = body.search(new RegExp('<(' + tags.join('|') + ')(?=[\\s>/])', 'i'));
if (at < 0) return { pre, intro: body, rest: '', post, found: false };
const before = body.slice(0, at);
const lastP = before.search(/<p\b[^>]*>(?:(?!<p\b)[\s\S])*$/i);
if (lastP >= 0) {
const para = before.slice(lastP).trim();
const words = para.replace(/<[^>]+>/g, '').trim();
if (words.length <= 80 && (/:$/.test(words) || /^<p\b[^>]*>\s*<(strong|b)\b[\s\S]*<\/(strong|b)>\s*(<\/p>)?$/i.test(para))) at = lastP;
}
return { pre, intro: body.slice(0, at), rest: body.slice(at), post, found: true };
};
// Plain text to HTML: blank-line paragraphs, single line breaks, '- ' lines as a list
const toHtml = text => String(text || '').split(/\n\s*\n/).map(x => x.trim()).filter(Boolean).reduce((acc, para) => {
const lines = para.split('\n').map(l => l.trim()).filter(Boolean);
if (lines.every(l => /^[-*]\s+/.test(l))) {
const lis = lines.map(l => '<li>' + esc(l.replace(/^[-*]\s+/, '')) + '</li>').join('');
return acc.endsWith('</ul>') ? acc.slice(0, -5) + lis + '</ul>' : acc + '<ul>' + lis + '</ul>';
}
return acc + '<p>' + esc(para).replace(/\n/g, '<br>') + '</p>';
}, '');
// Replace only the intro: everything from the first heading, list or table down stays as it is
const parts = splitIntro(live, s.intro_ends_at);
const intro = toHtml(d.final_text);
return { json: { ...d,
html: parts.pre + intro + (parts.rest ? '\n' + parts.rest : '') + parts.post,
kept_sections: parts.found,
url: product.onlineStoreUrl || product.onlineStorePreviewUrl || ''
} };Add an If node named Dry run? checking whether {{ $('Push settings').first().json.dry_run }} is true: on the true branch, connect a Data table node named Save the dry run (Row > Update matching product_id, setting html to {{ $json.html }} and status to dry_run, which you can push later by setting the row back to approved and dry_run to false). On the false branch, add an HTTP Request node named Update the description (with a red sticky note on the canvas reminding you that it writes to live Shopify products, using variables { id: $json.product_id, html: $json.html }) and run the productUpdate mutation:
mutation SetDescription($id: ID!, $html: String!) {
  productUpdate(product: { id: $id, descriptionHtml: $html }) {
    product { id }
    userErrors { field message }
  }
}
Connect Update the description to an If node named Saved? checking whether {{ !$json.errors && ($json.data?.productUpdate?.userErrors || []).length === 0 }} is true. On the true branch, connect three nodes in sequence:
- Mark pushed (Data table, Row > Update where
product_idequals{{ $('Merge the intro').item.json.product_id }}, settingstatustopushed,htmlto{{ $('Merge the intro').item.json.html }}, anderrorto empty). - Save as an example (Data table, Row > Insert into
description_examples, withcategoryset to{{ $('Merge the intro').item.json.category }},textset to{{ $('Merge the intro').item.json.final_text }}, andsourceset to{{ $('Merge the intro').item.json.edited ? 'edited' : 'approved' }}, ensuring only human-approved copy ever enters the example pool). - Reply: live (Slack, Message > Send, Channel by ID
{{ $('Merge the intro').item.json.slack_channel }}, Options > Reply to a Message with Message Timestamp{{ $('Merge the intro').item.json.slack_ts }}, and TextLive on the store: <{{ $('Merge the intro').item.json.url }}|{{ $('Merge the intro').item.json.title }}>, Slack’s link format, so the reply shows the product title rather than a long preview URL).
On the false branch of Saved?, connect a Data table node named Mark failed (Row > Update, setting status to failed and error to {{ [...($json.errors || []), ...($json.data?.productUpdate?.userErrors || [])].map(e => e.message).join('; ') }}) followed by a Slack node named Reply: failed (same thread reply settings, with Text :x: Shopify refused it: {{ $('Mark failed').item.json.error }}).
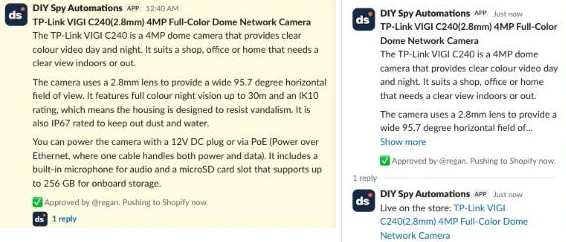
Open the TP-Link VIGI C240 product page in Shopify to verify that your new three-paragraph intro sits cleanly above the untouched <h3> specification sections. We pushed three other layouts on the test store as well: a description that opened with a bullet list kept all of it with the new intro on top, a description wrapped in one <div> kept its wrapper, its “Specifications:” label, its table and a brand block below, and a description that was only two short paragraphs was replaced whole.
What it costs to automate product descriptions
On the VIGI C240, which has the largest prompt of our test products because it carries a trimmed manufacturer page and a spec list, a description sent 1,617 input tokens and got about 190 output tokens back, by Ollama’s own count; products without a manufacturer page came to roughly 500 to 700 input tokens by n8n’s estimate. At Ollama Cloud’s list prices (checked November 2026), gemma4:31b costs US$0.14 per million input tokens and US$0.40 per million output tokens, so the VIGI C240 description cost about US$0.0003, on pay-as-you-go billing with no monthly subscription required (or US$20 a month for Pro with US$60 of usage credits). Compare that with Describely at US$0.75 per product on pay-as-you-go up to 500 products, or Shopify’s built-in generator, which is free on every plan but works one product at a time with no bulk editing.
| Piece | Price (checked November 2026) | 500 | 2,000 | 10,000 |
|---|---|---|---|---|
| n8n | US$0 self-hosted, or n8n Cloud Starter €20 a month billed annually | US$0 or €20 | US$0 or €20 | US$0 or €20 |
gemma4:31b on Ollama Cloud | US$0.14 / 1M in, US$0.40 / 1M out (about US$0.0003 a description, measured) | ~US$0.15 | ~US$0.60 | ~US$3 |
gpt-oss:120b on Ollama Cloud (larger fallback) | US$0.15 / 1M in, US$0.60 / 1M out (about US$0.0014 a description, measured, mostly reasoning tokens) | ~US$0.70 | ~US$2.80 | ~US$14 |
| Manufacturer pages | Free with a plain HTTP request | US$0 | US$0 | US$0 |
| Describely (paid app, for comparison) | US$0.75 a product, up to 500 | US$375 | custom | custom |
| Shopify’s built-in generator (for comparison) | Free, one product at a time | US$0, by hand | US$0, by hand | US$0, by hand |
The settings that move your token bill most are max_chars_manufacturer (which accounts for the largest share of input tokens), the model you pick (gpt-oss:120b costs about five times as much per description, almost all of it in reasoning tokens you never see), and how many examples you include in the prompt. If you run on n8n Cloud Starter (€20 a month billed annually for 2,500 executions), the two schedules use about 960 executions a month even when nothing is tagged (240 for Write every three hours and 720 for the hourly Push backstop), plus one execution per Slack button click, whereas Push runs triggered by Review execute as sub-workflows and do not count against your monthly quota.
Common mistakes
Writing from the title alone
When a product has only a title and a price, a language model will invent plausible materials, dimensions, or compatibility claims to fill the word count. Keep min_facts at 5 or higher so thin products are parked in needs_specs until their metafields are populated.
Trusting the model’s numbers
Even with source specs in the prompt, models occasionally convert units roughly or invent ranges, like the 4.5 m microphone claim a larger model wrote for the VIGI C240 from a range given in feet. Always run the output through Check the draft so every number and alphanumeric code is verified against p.context.
Treating every flag as an error
Standard terms like 19-inch rack widths or Cat6 cabling often appear in good copy even when a minimalist spec sheet omits them. Add genuine industry standards for your niche to always_ok in Write settings rather than turning off or loosening the number regex.
Rewording the manufacturer’s copy
If you ask a model to rewrite the manufacturer’s marketing blurb without examples of your own voice, your Shopify product descriptions end up reading like every other retailer’s page. Use manufacturer and supplier text strictly as a quarry for facts, and let your approved examples in description_examples dictate the phrasing.
Fixing samey copy with more banned phrases
Whenever you ban a cliché in banned_phrases, the model simply leans harder on its next favourite transitional phrase. Replace generic seed examples with varied, human-edited descriptions from your own catalogue so the model imitates good writing instead of dodging a growing blacklist.
Overwriting the whole description
Writing descriptionHtml without checking for existing headings wipes out specification tables, size charts, and care instructions that took hours to format. Keep the tags that begin your structured sections in intro_ends_at so Push only replaces the intro above them, and read the card’s current-intro line before you approve: it tells you when a description has no lists or headings and will be replaced whole.
Publishing a catalogue without review
Generating and publishing thousands of unchecked product pages at once risks violating Google’s spam policies on scaled content abuse, and Shopify’s own help documentation warns that AI outputs can contain errors and need human review. Keep the Slack approval step so every description gets a quick human check before going live.
Make it your own
Products with no manufacturer page
If you sell own-brand, handmade, or fashion items where no external manufacturer URL exists, feed facts from your own spec sheet, extract text from a supplier PDF using n8n’s Extract From File node, or pass the product photo through a vision model and label that output clearly in the prompt. For a clothing store, store fabric composition, fit, and care instructions in metafields and add words like fabric, cotton, wash, fit, and inseam to spec_words.
Manuals and datasheets
When setup rules differ from marketing pages, add a PDF branch in Step 4 using the Extract From File node and run its output through the same Focus the page logic. Label each section in Build the prompt by its source type (for example, INSTALLATION MANUAL versus PRODUCT PAGE) so the model only takes wiring or assembly advice from the manual.
Meta descriptions or FAQs from the same sources
Once Build the facts and Focus the page have assembled verified context for a product, you can reuse both p.context and Check the draft for other copy on the page. Add a second prompt for an SEO meta description or a two-question FAQ block, run the same number check over it, and add a second plain_text_input block to the Slack review card.
When Data Tables aren’t enough
If your catalogue grows past the size limit of n8n Data Tables, the template’s README covers the limit, and the repo has a Supabase version of this workflow with every Data table node swapped for a Postgres node.
Frequently asked questions
Will AI-written product descriptions hurt my SEO?
Publishing AI product descriptions does not hurt rankings by itself, provided the output is accurate and helpful to shoppers. Google’s documentation on generative AI content focuses on quality and says it’s critical to fact-check and review AI-generated text before publishing, whereas generating masses of unreviewed pages that add no value can trigger its scaled content abuse policy. Grounding every draft in product metafields and reviewing each card in Slack keeps your pages accurate and distinct.
How long should a product description be?
When your product page already displays a specification table below the fold, an intro of 80 to 150 words across two or three short paragraphs is enough to explain what the product is, who it suits, and what owning or installing it involves. Nielsen Norman Group’s research on product descriptions found that incomplete or unclear product information caused 20% of the task failures in its ecommerce studies, and that shoppers skim the opening lines for practical answers.
Can I just use the manufacturer’s description?
Pasting the manufacturer’s blurb leaves your store with the exact same wording as every competing reseller and often includes promotional claims or warranty terms that do not apply to your checkout. Using the manufacturer’s page as a factual input while writing fresh prose in your own store’s voice gives shoppers clearer answers without duplicating supplier text verbatim.
Isn’t Shopify’s built-in generator enough?
Shopify’s built-in AI description generator (now part of Sidekick in the Shopify admin) is handy when you are adding a single product by hand and want a quick paragraph from a few keywords. However, it does not support bulk generation across tagged products, does not fetch external manufacturer pages, and does not verify numbers in code.
Do I have to label AI-written descriptions?
Not on your own product pages: Google’s guidance on generative AI content asks for accurate, reviewed content and suggests explaining how automation was used where that helps your readers. Google Merchant Center is stricter. Its description attribute rules say descriptions created with generative AI must be submitted in the structured_description attribute, with digital_source_type set to trained_algorithmic_media, instead of in description. If your products feed Google Shopping, check how your feed app fills the description, and send these intros through structured_description where you can (a supplemental data source in Merchant Center is one way to do that).
Next steps
Import the workflow into n8n, run the Setup lane once to create your three Data Tables and the Manufacturer page field, write your brand_voice, and replace the three seed rows in description_examples with descriptions from your own store. Tag five products with describe in Shopify, set dry_run to true in Push settings, click Run now on the Write lane, and review your first batch of cards in Slack.